Friday, August 3, 2018

Another Jelly-Roll Rug!


Just made another Jelly-Roll Rug, only this time with 20 strips instead of 40!


The size came out to 21x30" - perfect for a kitchen or smaller bathrooms.


I cut fabric from my stash for this one - I simply selected 20 of my least favorite low-volume fabrics, and was happy with how it turned out!

Trust me, there will be more Jelly-Roll Rugs in my future!  :)

Thursday, July 5, 2018

Jelly-Roll Rug Tips and Tricks


I still have to laugh - one of the gals at a recent All Day Sewing Day was working on a Jelly-Roll Rug.  She showed me the pattern and I thought she was insane - why would anyone pay money for a Jelly Roll, then spend hours stitching a rug when you could simply purchase one for next to nothing at Target, especially since you were going to throw it on the floor and walk all over it?!  (Uh duh, that would be what we do as quilters on a regular basis, now wouldn't it, minus the walking-on-it part?!)  

The crazy thing was that I couldn't get that rug off my mind!  I went home and watched every YouTube video I could find, searched all the hashtags on Instagram, and read everything I could find about tips and tricks in making a rug.  I even e-mailed the pattern author!  The more I read, the more nervous I was that I wouldn't end up with a rug I was happy with.  But finally, I felt like I had gathered enough info and was ready to take the plunge.


It turned out great, and I had so much fun making it! 
And, after all the research I did, I wanted to document it here and share it with you as well.


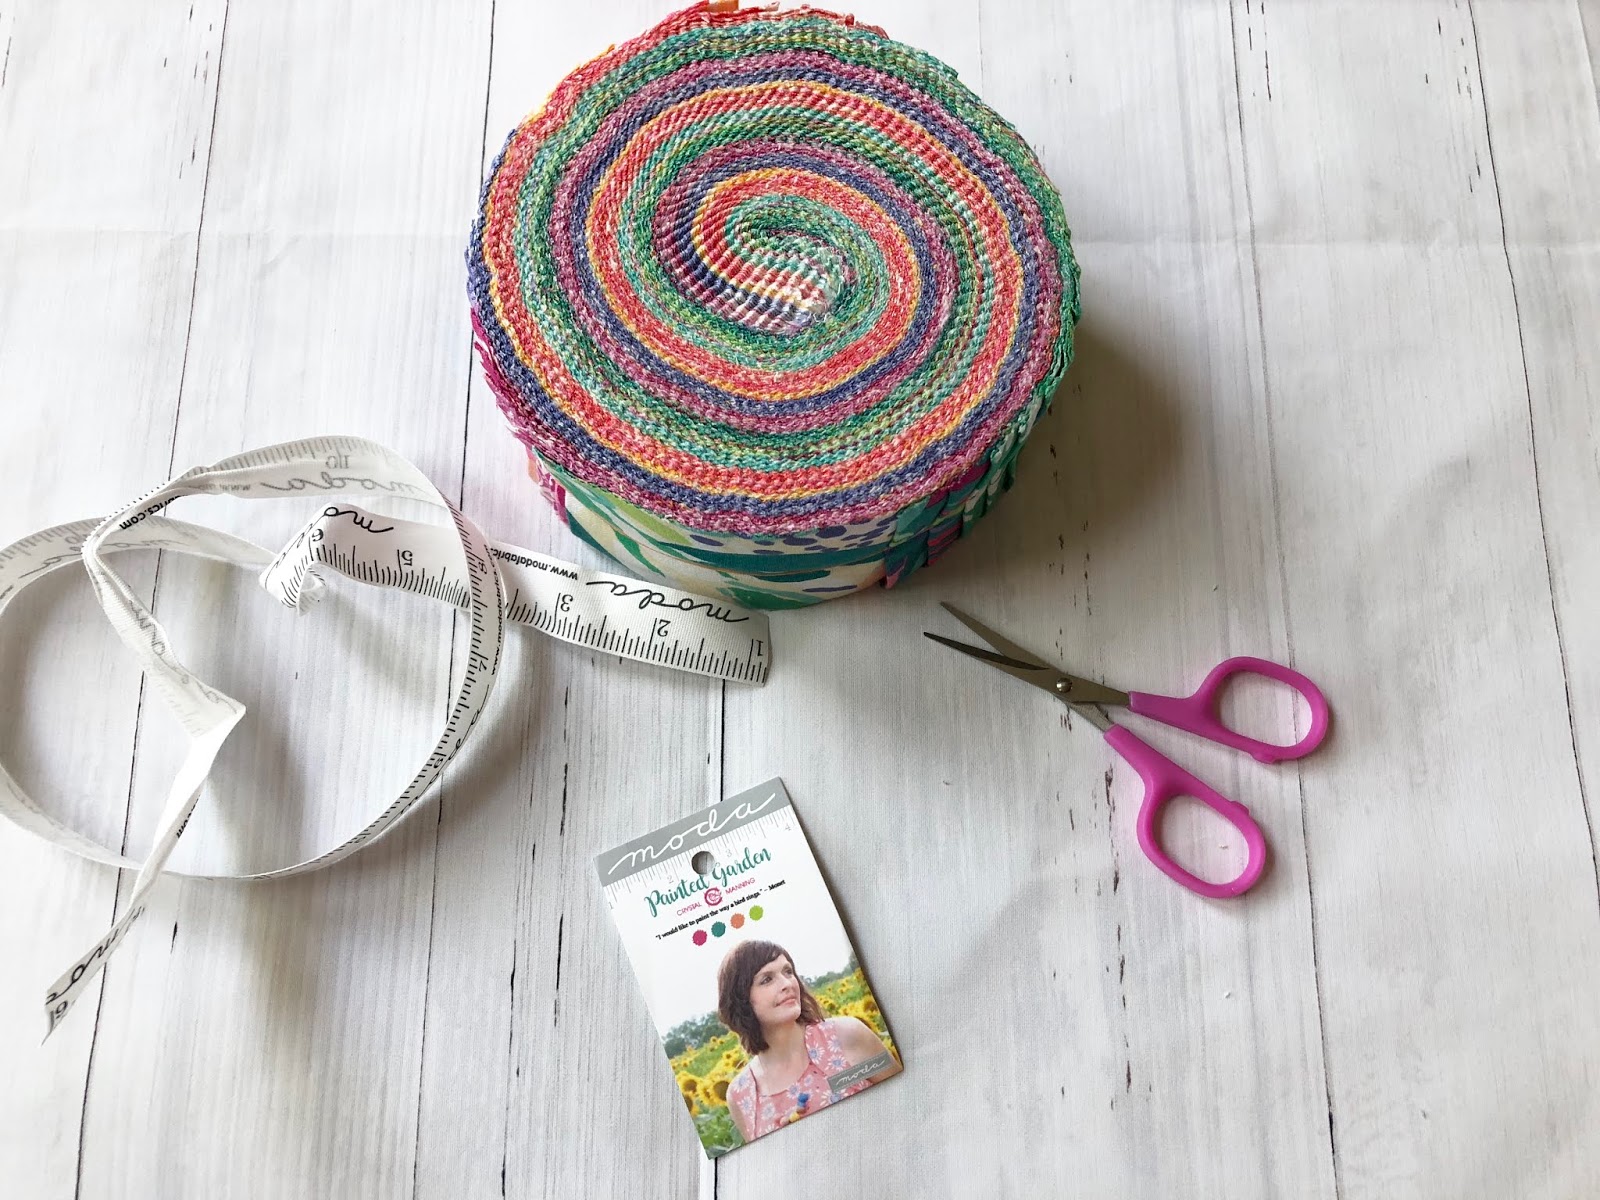
So, here are my Jelly-Roll Rug Tips and Tricks:


~ First of all, you'll need to purchase Roma Lambson's Jelly-Roll Rug pattern.  I purchased it from The Old Country Store, the local quilt shop where I teach classes.  You can purchase a downloadable PDF from Roma's Etsy shop here, or you can find it online from various shops, 

~ This video by Erica Arndt of Confessions of a Homeschooler was the most helpful of the ones I viewed.  Thanks, Erica, for filming it!


~ You can use a Jelly Roll or cut 2-1/2" WOF strips from your stash.  If you decide to use a Jelly Roll, you can rearrange the order of the fabric strips, but I decided not to over think it and used them in the exact order they were arranged on the roll.  I simply decided which strip I wanted on the outside of the rug (usually the darker values look best on the outside).  


It was so fun to see the design emerge!!


~ Instead of fan folding my pieced fabric strips, I simply let them fall into a small round laundry basket as I seamed them.  Then, when pressing the seams, I allowed them to fall into a second laundry basket.


~ I used Warm & White batting scraps and also cut strips from batting yardage instead of the 2-1/2" Bosal precut batting roll.  It was a great way to use up all those skinny batting scraps that I've been saving, and it was cheaper too.  But, using the precut batting strips will save you some time.  My understanding is that the Boasal is not quite as thick, so your rug may end up being a little less substantial.  You can also use the 2-1/4" Bosal precut batting rolls that are now available.

~ I did not seam or fuse my batting strips; I simply lapped them, cut them on a diagonal, then butted them up and overlapped them ever-so-slightly.

~ I don't know if anyone has tried using polyester batting, but I would think cotton batting would be the better choice in case you need to steam press your rug to get it to lay flat.  Same with using a cotton/poly blend fabric such as vintage sheets - I would not try that until you get the hang of keeping your rug flat without pressing.


~ I used my Juki to stitch the fabric and batting tube; it speedily powered through the thick layers with no trouble whatsoever and didn't require a walking foot!  I wouldn't have even considered skipping the walking foot if Erica hadn't mentioned that in her video.

~ If you find you do need to use a walking foot for stitching the tube, try to center the tube under the walking foot so that the walking foot isn't hanging over the tube, and so that the tube is centered over the feed dogs as well.  You'll likely need to move your needle over a few notches if you are stitching on the edge of the tube vs. in the center.


I used a 3.0 stitch length and chose to stitch a slightly less than 5mm seam (less than 1/4").  


I was really happy with the way that looks in the finished rug.  


~ I turned the edges in toward the center and clipped as I went along, using no more than five Clover Wonder clips at a time.


~ Again, I allowed the tube to coil into a round laundry basket, even though rolling the long fabric tube into a ball results in a way cooler effect!


~ If you choose to roll your tube into a ball, Clover Wonder Clips in place of rubber bands work great to keep it from unrolling.

~ When it comes time to zig-zag the coil together to make the rug, I would encourage you to make a test swatch and test your stitch length and tension.  For whatever reason, I had trouble with skipped stitches using a Denim/Jeans needle on my Bernina until I switched to a Topstitch needle.  I only had a size 14 on hand, but a size 16 would probably have been a better choice.  Had I taken the time to do a test swatch, I could have saved myself from unpicking a lot of stitches.

~ You'll probably want to change your sewing machine needle at least once if not more during the zig-zag stitching process.  Keep in mind you are sewing through four layers of fabric and four layers of batting.  I could hear that my needle was getting dull, but I didn't bother changing it because it didn't seem to be impacting my stitch quality.


~ I followed Roma's recommendations on the stitch length and width, and was really pleased with the results.

~ When stitching the first sharp turns, I found a Clover Tailor's Awl to be helpful in guiding the fabric tube and holding it in place.

~ I had planned to use a walking foot, but I felt that I got better results with the dual feed.  I did reduce the foot pressure to 25 on my Bernina.

~When zig-zag stitching the coils together, keep your eye on your presser foot and don't look away, especially on the turns!  This may sound like a no brainer, but I found myself admiring the rug instead of watching what I was doing, and before I knew it, my stitching was no longer in the center and I had missed catching both sides of the coil, especially when I was going around the curves.  

~ A flat bed machine is ideal, but not all quilters have that kind of set up these days.  I simply used three plastic Art Bin boxes next to my machine, and that allowed me to keep the rug flat as I was stitching it.  You basically can use anything to create a flat surface - books, foil roasting pans, you name it!  

~ After seeing numerous pictures on wavy rugs online, I was really concerned that I wouldn't be able to keep my rug flat.  But, I had absolutely no trouble.  A flat surface was most likely the secret.  Also, as soon as the rug starts getting wonky, take it off the machine, spray both sides liberally with Best Press or spray starch, press flat and allow to cool before proceeding.  I mixed up a solution of half Stay Flo and half water in a spray bottle, but never even needed to use it!


~ Don't feel like you need to have your machine sitting on a large table.  I simply folded the rug as needed while I was working on it.

~ I had a number of thread start and stops, either because I had stitched off course, or due to the bobbin running out.  I chose to bury my thread ends (I know, I'm probably the only one out there crazy enough to do that, but it really does make for a nice stitch if you want to take the time to do that.).


~  I was really happy with my decision to use Aurifil 50 wt 100% Cotton Thread.  I considered using So Fine polyester thread thinking it would be stronger, but then I was concerned about pressing a polyester thread with high heat if my rug needed lots of pressing.  My go-to shade of Aurifil 2021  blended in beautifully.


I looove the finished rug!  It was such a "zen" project....  I really, really enjoyed working on it.  Can't wait to make another one!!


Saturday, April 28, 2018

A Visit to Missouri Star Quilt Company!

Oh man, I can't believe that I haven't done a blog post since last summer!!  I love blogging, but I ran into snags with uploading photos from my camera to my computer, then I found I was using my phone to take photos more than my camera, and then found cell phone photos to be more cumbersome to upload, blah, blah, blah.  And then I discovered that most quilters are hanging out over on Instagram!  I have fallen in love with the ease of posting photos from my phone to Instagram on a regular basis.  But, nothing replaces the back story that can be told on a blog, and l love being able to include all the appropriate links, etc. on a blog post.  I also like to have an outlet to journal my thoughts, etc. And, I really like being able to document my work and days on this blog; it pretty much functions as a digital scrapbook for me.  So, here I am again, and hopefully once I get some of these techy snags resolved I can make blogging more of a priority!

(PS - I haven't figured out how to include a "follow me on Instagram" button on my blog, so in the meantime, look me up on Instagram under @missandreaquilts!  I post regularly over there!)


OK, so back to the subject of this post!
I was so thrilled to have the opportunity to visit Missouri Star Quilt Company in Hamilton, Missouri last week!  I know a number of you are interested in making that trek as well, so I thought I would do a blog post to document our trip as well as provide you with all the info you'll need.


Missouri Star was on my bucket list of fun things to see or do, but to be honest, not terribly high on the list.  I'm not sure why....  Maybe because I've been a pre-cut snob for the longest time.  (I'm finally slowly, but surely getting over that prejudice.  I could explain my issues, but I'll save that for another time!)  Missouri Star uses primarily pre-cuts in their tutorials and patterns so that you can quickly make a lovely quilt.

photo credit: MSQC
Or maybe it was because it always annoyed me that Jenny Doan made quilting sound way easier than it really is (at least for me!) - ha!

I think I was envisioning a hokey company that cut corners and did sloppy work??


But, I was totally blown away from the moment we walked into that first shop....  Our mouths were both hanging wide open and we were so dumbfounded.  I don't even know if I can put into words how it impacted me!  Part of it was that every shop is so perfectly curated and staged.


 Each of the 14 shops had their own distinct style; there was just so much eye candy to look at!  MSQC obviously has one heck of a design team.

Maybe another piece of it was the fact that Missouri Star tends to target newer quilters, and there was just such an upbeat vibe happening among the shoppers and the staff; there just didn't seem to be any snobby, know-it-all quilters around.

I don't know, I still can't put my finger on it!


It was so fun to see so many of the quilts up close and personal that are featured in the MSQC tutorials and patterns.  I was impressed with the longarm quilting designs that were selected for each of the quilts.  Now that I've gotten over my snobbiness, I'm eager to stitch up a few of their patterns!


I love the fact that MSQC has breathed new life into a depressed town.  Actually, it reminds me so much of what Longaberger did for Dresden back in the day.


And, the buildings are so cool....


There was simply so much detail to take in....


My friend JoAnn was the perfect traveling companion for this trip.  :)


We did great together!  We both think about quilting 24-7, love to explore, and believe in healthy eating but also know when to break the rules and live life (that would explain our nightly Dairy Queen ritual!).  I still am a bit in awe of how this trip fell together.

 Basically we discovered that we both wanted to visit Missouri Star sometime, we decided that we should go sooner vs. later (yes, I am in that stage of life!),


 ...and before we knew it, we had nailed down a date and purchased plane tickets.  It did indeed feel like this was a trip that was meant to be, for both of us.


Our days were packed full, but Hamilton shuts down at 5:00, so that allowed us to relax a bit in the evening, which is always nice.
:)


I feel like we didn't get to take in as much Hamilton food as I would have wished, but we did make several stops at the Hamilton Baking Company and Cafe - so YUMMY!!!!  I had one of the best chocolate cookies I have eaten in my entire life, and it was gluten free!  We even made one last stop on our way out of our way, heading to the airport; I'm so glad we did - my Brisket Breakfast Burrito was soooo good!


Hank & Tanks BBQ (located in an old gas station!) came highly recommended, but they weren't open the days we were there.  Also, I really wanted to check out the Blue Sage restaurant, but it didn't fit in the schedule.  It's run by the same chef that is in charge of the bakery, so it has to be fabulous.  Hopefully next time we can check out those establishments.


photo credit: Crossroads Quilting
As far as other quilt shops in the area, Crossroads Quilting was within walking distance of our hotel in an old strip mall.  It was such a nice shop - don't let the outside mislead you!


 Angela Walters' quilt shop and studio is located in Liberty, MO, just outside Kansas City, so we decided to check it out since it wasn't far at all from where we were staying.  It's such a cool shop!


I was hoping Angela would be there, but she was at home tending to her husband who was recovering from major surgery.  Instead, we got to see her via one of her videos that was playing.  :)


We also checked out The Fabric Chic, a lovely, brand new modern quilt shop located on the other side of Kansas City.


I am really happy with my purchases!!  (The fact that I can't bear to put them away is probably evidence of that!)  I was determined not to go overboard, and I think I succeeded.  I packed light and only took one small suitcase, and was still able to get everything home with me.

MSQC has lots of fun souvenirs - who can resist one of their chicken tape measures!!
Or, their collectible charms....
:)

And last of all, we were able to take in some Kansas City food and sites. The midwest isn't nearly as congested as the East coast and midwest drivers are much more courteous, so we didn't have any trouble navigating KC traffic


 BBQ is truly a sacred institution out there!


I feel like I owe an apology to the goofy guy at the Hertz counter in Kansas City.  He recommended that we check out Q39 on 39th St. in the city, known for its BBQ and burnt ends.  What in the world are burnt ends?! I had never even heard of them and assumed he didn't know what he was talking about!  We didn't know where else to go, and we had some time to kill, so we decided to check it out.  I'm so glad we did; that restaurant was simply amazing....


If you are a history buff, you will certainly want to take in the National World War I Museum and Memorial.


We didn't have time to do the museum, but it was really cool to walk around the monument and grounds...


... which gives you a great view of the city.


If you are planning a trip, below are some of the nitty-gritty traveling details that will be helpful to know, thanks to my friend Nancy who has done the trip several times; we basically followed her recommendations and didn't need to do much research on our own.


- We flew on Southwest out of BWI, nonstop into Kansas City.
(Southwest allows two checked bags for free, so that allows you to do plenty of shopping and bring your purchases along home with you instead of having to ship them!)
- Since long term parking at BWI is only $8 per day, we chose that option.
- Hertz car rental at the airport via AAA was super cheap at only $24.21 per day.
- We stayed at the Super 8 in Cameron; it's nothing fancy, but it was clean and reasonable at only $73.40 per night with a AAA discount.  (Nancy said, "don't stay at the Motel 6!")  Cameron is about an hour from the airport, and about 20 minutes from Hamilton.
- We flew out on a Sunday and flew back on Wednesday.  If you want to so some other sight seeing or visit additional quilt shops, you might want to stay an extra day.  Be sure to check ahead to see what is open on the days you will be out there.  Angela's shop is closed on Mondays and some of the restaurants were too.


Don't be alarmed by the Tornado Shelter sign next to the ladies restroom - ha ha!


Be sure to check out the event and retreat schedules.  We couldn't get into the retreat center, but I did get to see this much through the window.  It looked great and I've heard good reports about their retreats.


Bottom line, if Missouri Star is on your list of places to visit, don't delay - you'll love it!  
Let me know if you have any questions - I'd be happy to share any other info with you that might be helpful as you plan your trip.
:)