Friday, June 30, 2017

Learn Family Scrap Exchange Quilt


It's been so enjoyable to reflect on this quilting venture from my past....

 Here's the backstory:
Twenty-two years ago, my Aunt Joan invited me, my mother, my two sisters, and her two daughters to join her in making a scrappy nine-patch star quilt.  


The pattern was featured in the May and June 1995 issues of Quilters Newsletter Magazine.  (The magazine is no longer in print - talk about feeling old!)  

It was a great concept - each participant was to cut out and stitch enough blocks for their own quilt, then swap them with the group, resulting in a super scrappy quilt top.  

So, at our annual family reunion in 1995, Aunt Joan got us organized, gave us instructions, and sent us home to get to work.


The following summer, we swapped blocks at my grandmother's kitchen table.


Each of us also made signature blocks to swap.


Using a light box, we traced patterns and signed our names.  


My mother Ila Learn Hoke
Then, we headed home again to assemble our quilt tops.


A year later in 1997, we showed off our completed quilt tops to each other. 
Finally in 1998 at my grandparents' 70th wedding anniversary, we displayed all seven quilts on the clothesline at their farm in Indiana County, PA.

Left to right: my sister Alison, me, my sister Renee, and my mother

My Aunt Joan (my mother's sister) and my mother


Quilters Newsletter Magazine, 2001

A few years later, my aunt submitted our picture to Quilters Newsletter Magazine, and our "Cousins Quilts" were featured in the Letters to the Editor section - how fun!

But the story gets better!
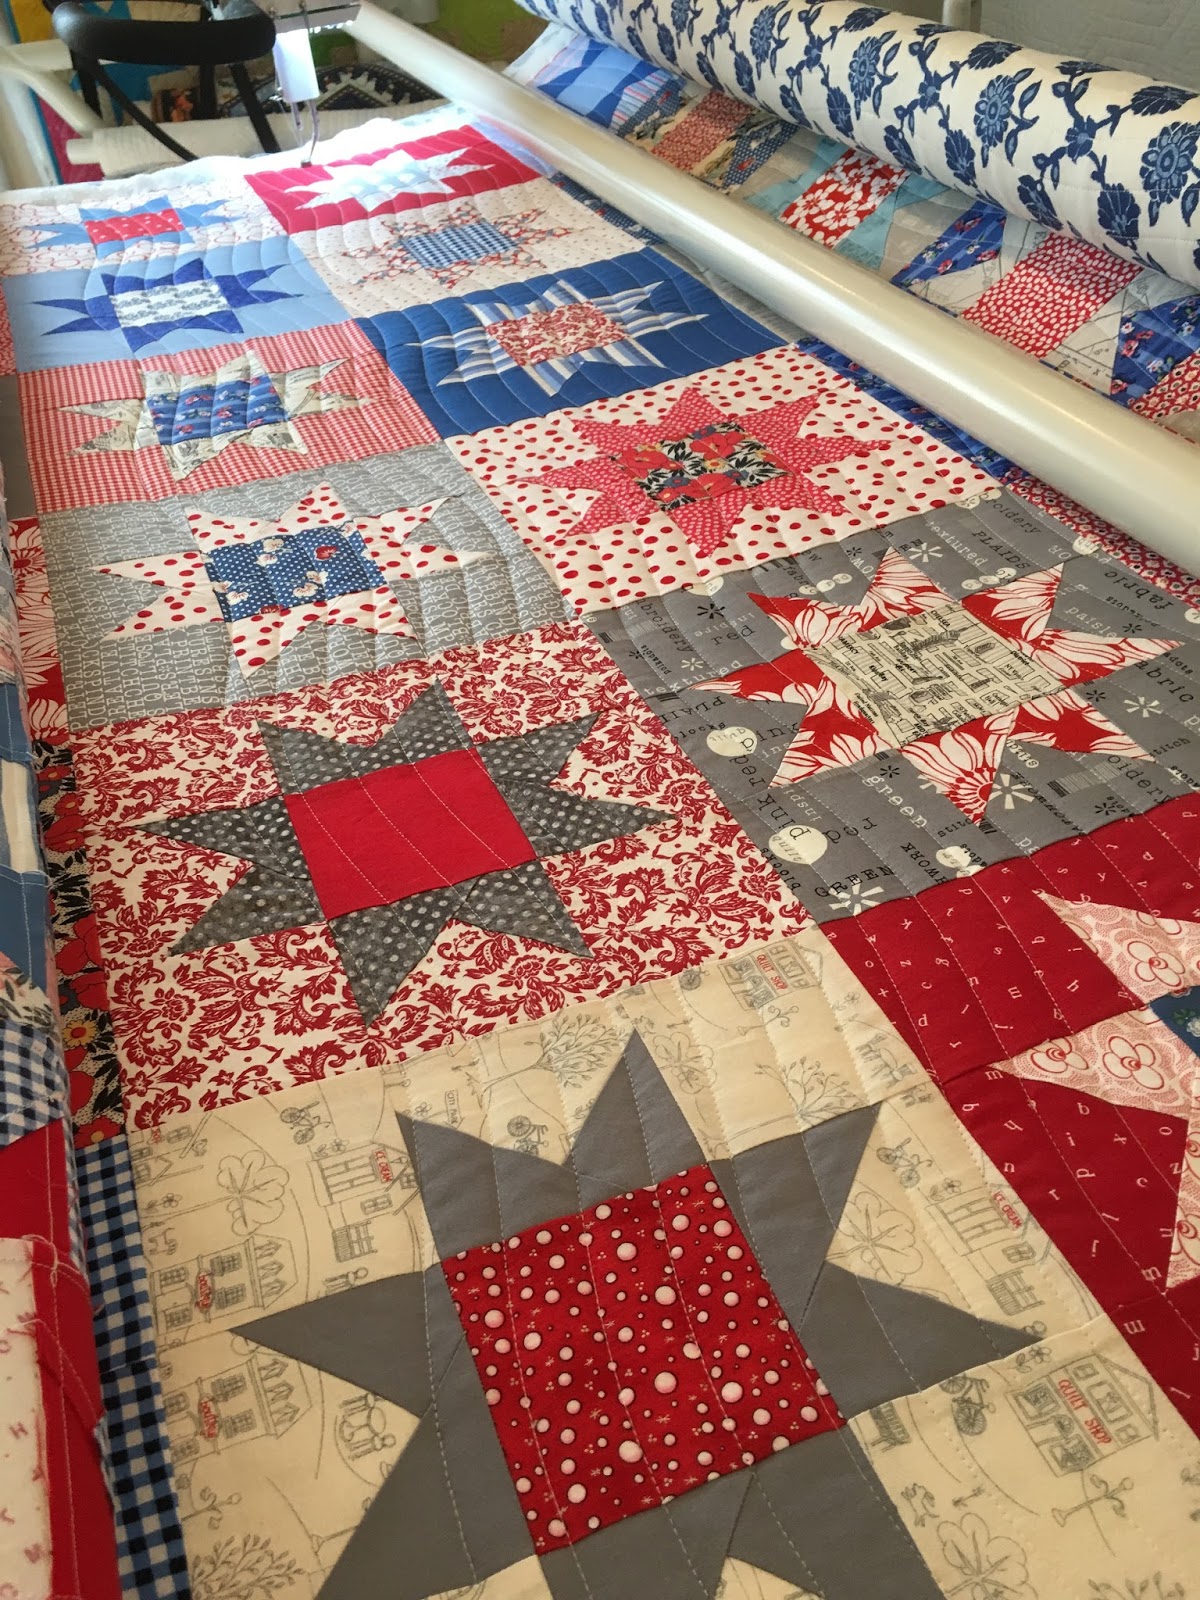
Imagine my surprise when I read Sherri McConnell's recent blog post on A Quilting Life - she posted pictures of a quilt top of her grandmother's that she had just discovered, and that she was planning to host a quilt along, inviting her readers to stitch the very same quilt along with her.  I was sure it had to be our quilt!  I pulled out my quilt and studied it - indeed, it certainly appeared to be identical!  How fun that her grandmother had stitched the same quilt as we did, and quite likely during the same time period.

It will be fun to see what current fabrics will look like in this pattern!

OK, here's my confession:  I have to be honest and admit that I never really cared for this quilt.  I wasn't totally in love with the fabrics.  And initially, because I had only minimally hand quilted it, it just didn't have a whole lot of personality.  I had stippled my sister Renee's quilt and wished I had done the same to mine.  Then, I got to thinking, maybe I could go back and stipple mine, and I did!  After I was finished, I threw it in the washer and dryer, and was so pleased with the texture and interest it added to the "ugly duckling" quilt.


In 2014 I had my cousin John tack it up on the barn at our family reunion so I could take some pictures of it.  After seeing it from a distance, I fell in love with it!


On ladders: my cousins Jerry and John Learn, and on the ground: my brother-in-law Paul and his son Eric

It was also included in the quilt display two years ago at our family reunion when I had the crazy idea to hang my entire quilt collection on the barn.  :)


Sherri, I hope your readers have as much fun stitching this quilt as we did!
Maybe I'll just have to make a modern version of it as well!

Thursday, June 15, 2017

Summer Evening Photo Shoot - July Star Blocks


 I can't think of anything I would rather do on a beautiful summer evening than photograph one of my quilts, 

especially when this is the scene that greets you on the other side of the fence!  
(What is it about a meadow scene at that magic hour just before sunset that always makes my heart ache for heaven??)


My friend Susan and her husband own a lovely B&B on West Ridge Road in Elizabethtown and were kind enough to allow me to photograph my "July Star Blocks" quilt on their property.  


I just love this quilt!  
(I can hear my friend Diane saying, "you say that about every quilt you make" - ha ha!)


I think the reason I love it so much is because I hated it when I first got started on it over a year ago.  It's super scrappy and has dated fabrics that I no longer love mixed in with current fabrics that I really, really like.  It was way too much.  I was so looking forward to making this quilt ever since I saw Allison Harris's photos of it six years ago on her blog and had been collecting fabrics for it ever since.  Terribly discouraged, I set it aside.  


But then, I read this blog post re: mixing solids in with prints and what ratio to aim for.  I don't usually work with solids unless it's a large amount of a background solid in one color, and just couldn't envision it.  But, she was right!  I purchased two shades of red, two shades of blue and one shade of gray and mixed them in  with the remaining blocks I hadn't yet stitched.  It did the trick!  I was amazed.


This post by Allison on using solids was helpful too.  


Jackie Padesky's instagram photo inspired  (I actually copied her!) the computerized quilting design done by The Last Stitch Quilting Service.  Imitation is the sincerest form of flattery, isn't it?!


I have a feeling I am going to cart this quilt all over the place this summer, looking for good spots to photograph it with flags or barns (or both!) in the background, but for now, I wanted to at least share these photos and the story behind the quilt!  


(I so want to take a picture of it in the field in front of this barn - wouldn't that be an amazing picture?!! - but not sure I can pull that one off.  In the meantime,  I need to keep my hands on the steering wheel and my eyes on the road!)
:)


Sunday, May 14, 2017

A Quilter's Tribute to Her Mother


I've wanted to write a bit of a tribute to my mother for quite a while, but never think of it in time for
Mother's Day or her birthday, which was also in May!

I'm so grateful my mother taught me to sew at a young age.  She earned a Home Economics Education degree from Penn State back in 1951, so it was only natural that she would make it a priority to teach her children those skills.  


I was doing embroidery by kindergarten (don't you love those wonky stitches!), and sewing my own clothes by fourth grade.  I'm thankful I grew up in the era when needlework was perfectly respectable and the norm.  


My mother would often help me finish projects if I hadn't yet mastered the necessary skills, 


such as stitching this little fish eye,


or adding the stars to my cross stitch sampler.


I learned to sew on her Featherweight sewing machine which she would have purchased shortly after graduating from college.


That probably explains why I still prefer sewing on a simple mechanical machine over a fancy computerized one!  (I sewed on a basic Kenmore for almost 20 years before upgrading to a Bernina.)


I'm still sure I would have learned to sew at some point and love it, even if she hadn't taught me, 


but I'm grateful I had such an early start!


Money was tight when I was growing up, but I was always allowed to order an embroidery kit from the Lee Wards or Hirschner's catalog - remember those?!


 I always had an embroidery project going that I stored in an old metal lunchbox.


My parents even bought me a Singer zig zag machine for my 12th birthday, continuing to provide what  I needed to keep sewing.


Interestingly enough, my mother (far right) confessed that didn't really enjoy sewing that much, but in that day and age, sewing was an expected skill, not an option.  She admittedly chose to study Home Economics because it was more appealing than the other limited options open to women at that time, such as becoming a secretary or a nurse.  

I didn't learn to quilt until 1991 when I took a Sampler Quilt class at a local church, but my years of sewing made the transition seamless. I do have to laugh, though - my mother always insisted that I finish a project before starting a new one;  she would be appalled at my current number of WIP's.  :)  

Thanks, Mother, for taking notice of my interest in sewing and nurturing it!

Wednesday, April 26, 2017

Cleaning Vintage Quilts


Every now and then I get a question on how to wash an antique or vintage quilt.  It makes people nervous, but I'm glad for that, because I would rather that the caretakers of these precious textiles think twice before tossing in them in washing machine with no thought whatsoever!


Below is some basic info about what has worked for me.  Of course, there is lots more detailed info on line, so be sure to see what other info you can find.

First of all, a few tips of what NOT to do:
  • Do NOT dry clean!  Vintage textiles are way too fragile for the harsh chemicals used in dry cleaning.
  • Do NOT use fabric softener or dryer sheets!  I just about croaked when a customer dropped off a quilt for repair that had been machine washed and dried with fabric softener and dryer sheets.  :(  They leave a nasty residue on these fabrics (and on our clothes as well!).


That being said, you CAN wash an older quilt in your washing machine if you follow the tips below.  It's really difficult to get a quilt clean and rinsed completely when washing by hand in the bathtub, so it's fine to use your machine as long as you take care when doing so.

  • First of all, be sure to mend any open seams or tears before washing.  Otherwise, these areas will only get worse when washed.
  • Use a gentle detergent.  Many quilt experts swear by Ovus Paste.  Most quilt shops carry it, or you can purchase it at your local farm supply store because, believe it or not, it's also used for washing horses!  I personally would avoid Woolite and laundry detergents designed for babies because they really aren't that safe or gentle.  More recently, I have been using Norwex's laundry detergent with good results; it doesn't contain fillers and it rinses out easily, which eases my concerns.
  • Wash in the machine with cold water on gentle cycle.  The most important thing is to take care when removing it from the machine.  A wet quilt is heavy, and wet fibers are fragile.  I usually take a sheet and place it under the quilt while it's still in the machine before removing it.  Then, remove from the machine by holding onto the sheet, not the quilt.  That way, there is no stress on the weak fibers.
  • Then, I carefully lay it flat to dry, squaring it up if possible.  Never hang a quilt to dry.  You can dry it outside with a a sheet underneath, but I'm always concerned about bug or bird dirt.  If you have enough space indoors, lay it flat and allow it to dry.  A fan or dehumidifier is helpful in speeding up the drying process.

Click here to read another post I had written on the same subject a number of years ago.  In this post I gave tips on protecting fraying fabrics or patches.

These recommendations are for quilts made out of cotton fabrics.  If your quilt is made of satin or other non-washable fabrics, do not attempt to wash it!   Dry cleaning isn't a good option either, so some people put a nylon stocking over their vacuum cleaner nozzle and remove dust and loose dirt by carefully vacuuming it.

Click here for more detailed info about this subject.


Sunday, April 23, 2017

Denise's Lovely Liberties


I just delivered this lovely commissioned quilt to a customer this evening!  


I took a few pictures of it at Masonic Villages the other evening, 


and then a few more today at Dickinson College in Carlisle where we met up for delivery.


It was a great experience - my first opportunity to work with some lovely Liberty Tana Lawn fabric, direct from London.


My friend Denise's brother Bryan lives in London and asked me to make a quilt for Denise out of Liberty's Tana Lawn since he knows how much she loves their fabrics.  He shopped for the fabric at the iconic Liberty department store right in London. We selected this Union Jack pattern to commorate Denise's numerous trips to England.


 Of course, anyone who knows anything about Liberty's Tana Lawns knows that is one extravagant gift!!


Since I had to part with the quilt (boo hoo!), I wanted to make sure I took plenty of pictures.
Bryan was a good sport about being my quilt holder even though he had no idea what being a quilt would holder entail - ha ha!


 He's the perfect height for such adventures!
I told him he's lucky he doesn't live nearby; otherwise, I would be nabbing him on a regular basis to help me out.  :)


Photo Credit:  Amy Smart

The original inspiration for this quilt came from Amy Smart's blog post almost five years ago.  I have looked at this amazing quilt of hers more times than I can remember!  I just love the fabric combination and colors.


I ended up using this pattern.  You can purchase it here or here.
While it does result in some fabric waste, the block construction is a lot of fun.


Photo credit:  Holly Lesue

Craftsy also has a free pattern for a Union Jack block that you can then turn into a quilt like this fabulous one made by Holly Lesue (Maker Valley on Instagram).


I was nervous about getting started on the project because the fabric is oh so expensive, and oh so fine.  But, it was very easy to work with.  Even so, below are some tips that you may find to be helpful.


Tips for working with Tana Lawn

First of all, lawn is a super fine, woven cotton fabric made out of fine, high count yarns.  Lawn gets its name from "Laon", a city in France that was known for its production of lawn fabric.  Liberty's Tana Lawn is call Tana because the founder, Arthur Liberty found the ultrafine long-staple cotton fiber that could be woven into fine lawn growing around Lake Tana in East Africa, hence the name.

Lawn is fabulous for garment construction because its tight weave doesn't fray or wrinkle, and results in wonderfully drapey dresses and blouses.  Quilters love using it because it produces an equally luscious drapey quilt.

If you have the opportunity to work with lawn, go for it!

  • Be sure to use a small needle such as a 70/10 or 80/12 Universal or Topstitch needle.  The topstitch needle will allow you to use a small needle without causing your thread to shred.  I found an 80/12 needle worked best.
  • Fine pins are essential!
  • A fine thread is key as well.  I used Aurifil 50 wt for piecing and machine quilting.
  • For both piecing and machine quilting, be sure to use a straight stitch throat plate if you have one, as the delicate fabric tends to pull down into the wider hole on a zig zag throat plate.
  • I used steam, but some quilters prefer to use a dry iron so fabric doesn't get distorted when pressing.
  • A thin, light-weight batting is ideal so that you don't lose the wonderful drape of the fabric.  I used 100 % Cotton Quilter's Dream in their thinnest Request loft, and have also used Quilters Dream Wool with fabulous results.
  • Since the lawn is a little more slippery than traditional quilting cottons, when layering your backing, batting and quilt top, be sure to pin baste no more than a fist width's apart (try saying that ten times in a row quickly!).
  • And, when machine quilting, keep in mind you may need to loosen your tension.

Take the plunge when you get an opportunity!


Such loveliness....

You can read more about working with lawn here and here.