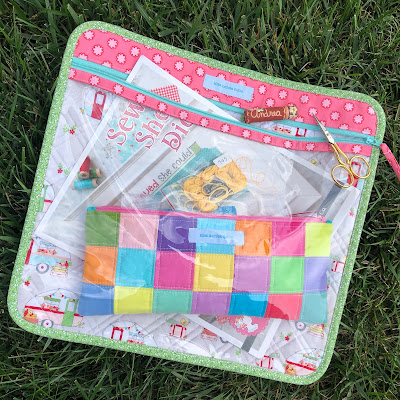
Here's a basic how-to for this simple project bag, perfect for counted cross stitch!
Finished size: 13" high x 14" wide
I couldn't resist stitching one out of this cute camper fabric in preparation for stitching Lori Holt's Happy Camper counted cross stitch pattern!
The project bag was inspired by Kristina Binkerhoff's Vinyl Project Pouch on the Moda Bake Shop.
I decided to use ByAnnie's Soft and Stable foam stabilizer to give it a bit more structure,
and I wanted to round my corners to reduce wear. I changed out the dimensions a bit so that it would be the perfect size for an 8-1/2" x 11" counted cross stitch chart, as well as supplies for a project.
Supplies needed:
- Fabric:
- fat quarter - one for front (visible through vinyl)
- fat quarter - one for back, contrasting bands on front, and zipper pull
- 1/2 yard for binding
- Shape Flex 101 fusible interfacing: 3-1/2" x 15"
- ByAnnie's Soft & Stable: 14-1/2" by 15-1/2"
- Zipper: nylon zipper 16" or longer
- Thread in neutral shade to match fabric (I used Aurifil, but So Fine would be a good choice as well.)
- 1/4" Wash Away Wonder Tape (for basting zipper)
- Clover Wonder Clips
- 1/2" Bias Tape Maker
- Fray Check
Cut fabric:
- Front (visible through vinyl): 14-1/2" high x 15-1/2" wide
- Backing fabric:
- back: 14-1/2" high x 15-1/2" wide
- top band - 3-1/2" high x 15" wide
- binding for top of vinyl: 2-1/2" x 15"
- zipper pull: 1" x 10"
- Bias binding: cut 2 strips 2-1/4" wide x width of fabric, cut on bias
- Vinyl: 11 x 14-1/2"
Machine quilt:
- Sandwich the backing fabric, Soft & Stable, and front fabric; pin to hold layers.
- Machine quilt as desired. (I used a walking foot and stitched a cross-hatch design 1-1/4" apart; then I went back and stitched another line of stitches1/4" to the right of each line of stitching.)
- Trim quilted piece to 13" high x 14" wide.
Prepare top band:
- Fuse interfacing to the back of the 3-1/2" x 15" backing fabric following manufacturer's instructions; fold in half lengthwise and press to create band for top of zipper.
Prepare vinyl:
- Pin 2-1/2 x 15" strip of quilting cotton in half lengthwise to create binding for top of vinyl.
- Clip binding to top of vinyl using Wonder Clips. Stitch to vinyl using a 3/8" seam. (You may need to use a teflon foot if you find the vinyl sticks.)
- Wrap binding to back of vinyl and top stitch close to binding fold.
Install zipper:
- Using Wonder Tape, adhere fold of top band to zipper along stitching line, centering band lengthwise. Top stitch band to zipper close to fold using a zipper foot. (If using a handbag zipper, you can use a 1/4" patchwork foot in place of zipper foot.)
- Do the same thing with the vinyl section.
Finishing:
- Layer zippered vinyl front section over quilted sandwich; trim zipper vinyl section as needed. ***Be sure to slide zipper tab in before trimming!
- Clip layers together and stitch 1/8" from edge.
- Round corners using a 2-1/2" round object; stitch again 1/8" from edge.
- Bind edges with bias binding.
- Stitch zipper pull using 1/2" bias tape maker. Slide through zipper tab and stitch to secure. Cut ends on diagonal and apply a bit of Fray Check to prevent fraying.
I want to play around with some other sizes, but this is a good start for now.
The current counted cross stitch craze has totally sucked me in, so I'm sure I'll be stitching some more bags for additional projects!


Thanks for sharing, it’s super cute!
ReplyDelete