Monday, June 22, 2015

Did I Bite Off More Than I Can Chew??


I'm not sure!

I debated and debated about having Kathy O. long arm quilt my Modern Building Blocks quilt top.  I knew she could fly through it and the stitching would be perfection, but in the end I decided I should tackle it myself, especially since it's simply straight line quilting with my walking foot.  And, I plan to enter it in our local fair in August and really wanted to be able to say that I pieced and machine quilted it myself.


I'm stitching the rows 1/2" apart.

I've stitched four rows so far - this is going to take me 4.EVER!
(Kathy, I guess it's too late for you to bail me out????)

I'm not 100% happy with my stitching, so I may rip out those first four rows....  
I'm using Hobbs 80/20 batting; it's a bit thicker than the Warm & White/Natural that I often use, so I think I need to adjust the foot pressure so there isn't as much drag.  Since this is such a big quilt (84x96!), there's a bit of distortion by the time I got to the bottom of the quilt.  This is the biggest quilt I've done the straight line stitching on; I've never had any issues with smaller quilts.


I've been keeping a card file for each machine quilting scenario I've done (both FMQ and walking foot), noting the batting, thread, needle, stitch length, and foot pressure.   It gives me a good starting point every time I tackle a new project.


As you can see, this is one BIG quilt - much bigger and I wouldn't have been able to baste it on my kitchen floor!


Sunday, June 21, 2015

A Few Quilt Top Finishes!


I took a quick break from my Modern Building Block quilt and stitched two Big Wonky Star quilt tops.


At my quilt guild's retreat earlier this month, Gloria showed me one of Jenny Doan's Block magazines that had this this pattern in it.  I couldn't get it out of my head, so I went home and stitched not only one top, but two!  It's a really quick quilt to stitch up. In fact, it took me longer to select, cut and then refold my fabric than it did to stitch it!  So, if you're using a layer cake, you'll have this together in no time.

The pattern calls for 10" Layer Cake squares which I didn't have, so I pulled some fabrics out of my stash and cut them into 7" squares since the scraps weren't big enough for 10" blocks.  At approx. 40 x 46, it makes a nice size baby quilt.

After studying it for a while,


... I wondered if the stars would stand out better if all the fabrics were of a medium value vs. some lights, so I stitched another one out of  my Denyse Schmidt stash.  This time I had enough fabric to cut 10" squares.  BUT, I like the first quilt better!!  I like the larger prints and the interest created by the various fabrics and values.  I think the DS fabrics are better showcased in smaller blocks or more intricate piecing.

Using 10" blocks, this quilt measures approx. 58" x 67".


When I laid my quilt tops out together to photograph them, I was surprised to discover that the Bella Solids from the Modern Building Blocks kit coordinate perfectly with the Denyse Schmdt fabrics!  SO, I got the idea to stitch yet another Wonky Star quilt out of the scraps from my MBB quilt and use it as the backing!  :)

Of course, this is after I already purchased some yardage specifically for the backing - this kind of thing happens to me all the time!!  :)

I think I 'll be happy with the Denyse Schmidt version once it has some interest to the back and it's quilted with a wavy stitch.


I do love how these fabrics look so beautiful together!!


Finally, here's a photo of my finished Modern Building Blocks top - I LOVE it!!!!
I'm kinda sad to be finished with the piecing....

:)


Sunday, June 14, 2015

Some More Vintage Quilt Tops to Finish


I have the privilege of finishing two lovely vintage quilt tops for a local family.  They found them when cleaning out their father's apartment in preparation for his move to an assisted living facility.  (It's amazing what gets discovered in that process!)


This nine-patch postage stamp quilt was entirely hand pieced - very inspiring....  It has an amazing assortment of fabrics (civil war era mixed with 30's prints) and very few repeats of prints.  It needs a bit of repair at the edges, but other than that, it is in great shape.  I'm planning to knot it in the center of each block, which will help draw your eye to the design.

The more I contemplate Jen Kingwell's approach to quilting, the more I wonder if I should attempt to hand-piece something similar.  It's such a remarkable quilt....


I'm guessing this second quilt is an Ocean Waves pattern??  I'm thinking I'll hand quilt this one with a simple utility stitch.


I could stare at these fabrics all day (which I was able to do while basting both quilts!!)....

Thursday, June 11, 2015

Yo Yo Sighting


Couldn't resist showing you pictures of the yo yo's my friend added to her mother's old apron.


She claims she isn't talented in the sewing dept - who is she kidding??!!

Wednesday, June 10, 2015

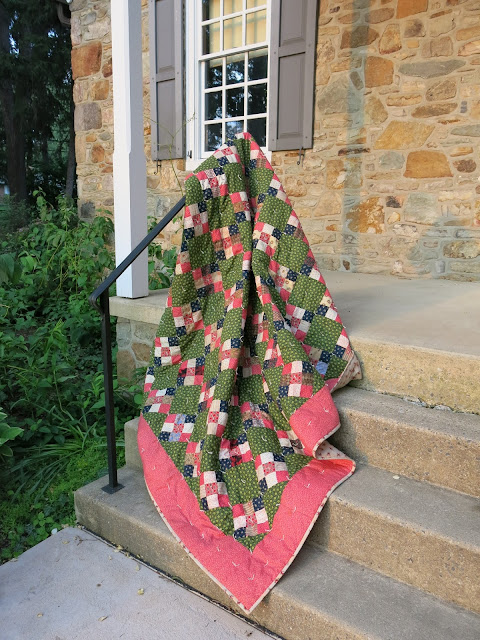
Antique Quilt Photo Shoot


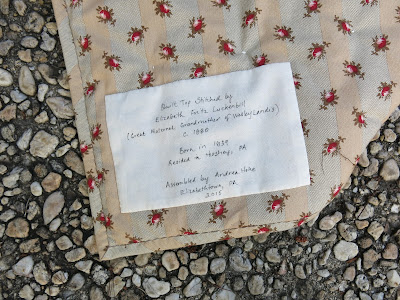
I had the pleasure of finishing another antique family quilt top for Mr. Landis.


The colors were so lovely, and the quilt so nicely designed and constructed that it deserved a photo shoot.  (OK, I'll admit it - I believe that every quilt deserves its own photo shoot!)


According to Mr. Landis's careful historical records, the quilt was stitched sometime around 1880.  He's right on the money as far as I'm concerned; his family records match my conclusions after I compared the fabrics in the quilt with the photos in my Dating Fabrics book: 


I debated and debated about how I should finish the quilt.  Since it is a c. 1880 quilt and was pieced by hand, machine quilting was out of the question.  I really wanted to do it justice and had planned to hand quilt it with a large utility stitch, 


but at the last minute I saw this quilt at an antique fair and concluded that simply knotting it might be be acceptable after all.


I used Hobb's 100% wool batting and knotted it with perle cotton #5.


As always, it's oh so important to document these antique quilts for future generations.


I thought this quilt was absolutely beautiful, so some of these pictures are for my own enjoyment and remembering.
:)


(Thanks, Linda, for suggesting this lovely spot at the college for photographing my quilts, and for tipping me off as to the perfect time of day when the lighting is best!)

Zip Pouch for a Project


In preparation for some vacation stitching next month, I made this zip pouch to hold my EPP stars as I work on them.  I figure I will be working on these for a loooong time, so it was worth making a pouch specifically for for the project!


Here's a view of the back.


I stitched the stars using the EPP method, appliqued them to the body of the pouch, then machine quilted it with my walking foot, spacing the lines 1/4" apart.  The body of the pouch is Essex linen - I do like that fabric!!  It makes me nervous to use it in an actual quilt because of its loose weave and its tendency to ravel, but it works nicely for it for a pouch.


A view of the inside.


And, a view of my thrift shop zipper.  :)


The size of the pouch is a bit odd, but I wanted it to easily accommodate the six-pointed stars as I complete them.


The pouch is done, but now the dilemma is to decide on which quilt design I want to do...
Since I can't decide, I may do two of them while I'm at it!  


:)

Tuesday, June 9, 2015

Embroidery Love


I stitched these lovely embroidery squares a few years ago.  Aren't they dear?!


 These sweet designs by Rebekah Shucksmith were featured in the June 2011 issue of American Patchwork and Quilting magazine.  I love, love, love embroidery, but as an adult, hadn't come across any designs I liked until I saw these.  I immediately stitched them up, but then didn't know quite what to do with them.  They were intended to be sachets, but I hated to tuck such lovely stitching away in a drawer.


I revisited them today, wondering if I should stitch some more squares and incorporate them into a quilt at some point.  I may just do that, but in the meantime, I thought I'd go ahead and at least turn one of them into a pin cushion.


Some piping and vintage buttons complete the look.


Can't wait to stitch some more - I thoroughly enjoyed ever single moment of working on these.  I felt like a young girl again, stitching away!

Monday, June 8, 2015

A Pin Cushion Bites the Dust


I decided it was time to finally retire my beloved pincushion....


I stitched this pincushion back in the 70's when I was in middle school (remember when mushrooms were all the rage?!).  My mom gave me the crewel embroidery kit as a gift, and she helped me add the fringe and stuff it with old pantyhose (back when you did just things out of necessity, not because it was trendy to repurpose!).

I was recently remembering how good my mom was about making sure that I always had a needlework project to work on, whether it was a cross stitch sampler, or pillowcases, dresser scarves or tea towels to embroider.  Even though money was tight, I was always allowed to order a needlework kit from the Lee Wards catalog.


I stitched a few new pin cushions out of  scraps from the Roman Shade in my sewing room.
I like how they turned out!


But, I think I'm going to still hang on to my old pin cushion.  I may find a glass jar with a lid to house to store it and keep it for posterity's sake!